|
APP: The itineraries in Involves Stage allow you to have a clear and objective view of the field team's route planning, allowing activities and tasks to be scheduled. Both periodic and scheduled itineraries can be registered in the system. PREREQUISITES: Employee registration, Concepts and types of itineraries. |
The itineraries in Involves Stage allow you to have a clear and objective view of the field team's route planning, allowing activities and tasks to be scheduled. The system has three types of itineraries: periodic, scheduled and portfolio type.
Periodic itineraries are those that have regularities and cycles that can be weekly, every two weeks or every four weeks. In addition, there are two ways to register: manually and through the import template.
Manual itinerary registration is done in the Itinerary and Visits feature, on the path:
Menu > Itineraries and Visits > Itineraries
On the feature page, you will find several survey filters to search for specific information, such as:
- Name of the Employee
- Name of the Superior Employee
- Store Number
- Point of Sale
- Profile Access
- Employee Profile
- Period, by itinerary type
- If the employee Has an Itinerary
- Macroregional
- Regional
- Banner
- POS type
- State
- If it is a Shared Employee
- Update after, by selecting a date after changing the itinerary
- Update before, by selecting a date before changing the itinerary
- If the employee is part of the Field Team
The page also features two buttons in its footer, with two purposes:
- Clear Itinerary: When you click on it, all the information entered in the employee's itinerary is deleted. Be careful when using this action as it cannot be undone.
- Accept Itineraries: This feature is only available for users who are registered as Field Team. It enables employees with Web access to take over the itinerary of other employees for themselves.
To register or edit a new itinerary, click on the name of the employee and after click on the Edit button, on the lower right-hand side of the screen. You will be taken to the Itinerary page, to specifically edit this employee, following these steps:
- Choose the type of periodic itinerary.
- Select the frequency of the itinerary, whether weekly, every two weeks or every four weeks.
- Select the points of sale that will become a part of each day of this itinerary.
ITINERARY TYPE
At the top of the screen you will find the name and picture of the employee, followed by the itinerary type, whether periodic or scheduled. In this case, select the Periodic Itinerary option.
FREQUENCY OF THE ITINERARY
Next to it, in the Frequency of the Itinerary field, where you choose whether it will be weekly, every two weeks or every four weeks. The option selected in this field determines the other fields presented on the page, so remember to do this step at the beginning of the registration. If you need to change the frequency of the itinerary after you have filled it out, only the point of sale of the current week will remain, the rest will be deleted.
If you choose to register check-in and check-out times for the points of sale, the expected working hours must appear in the Planned for the month field. This information, although not mandatory, helps to guide the employee in the field, as well as establishing delay alerts.
POINTS OF SALE SELECTION
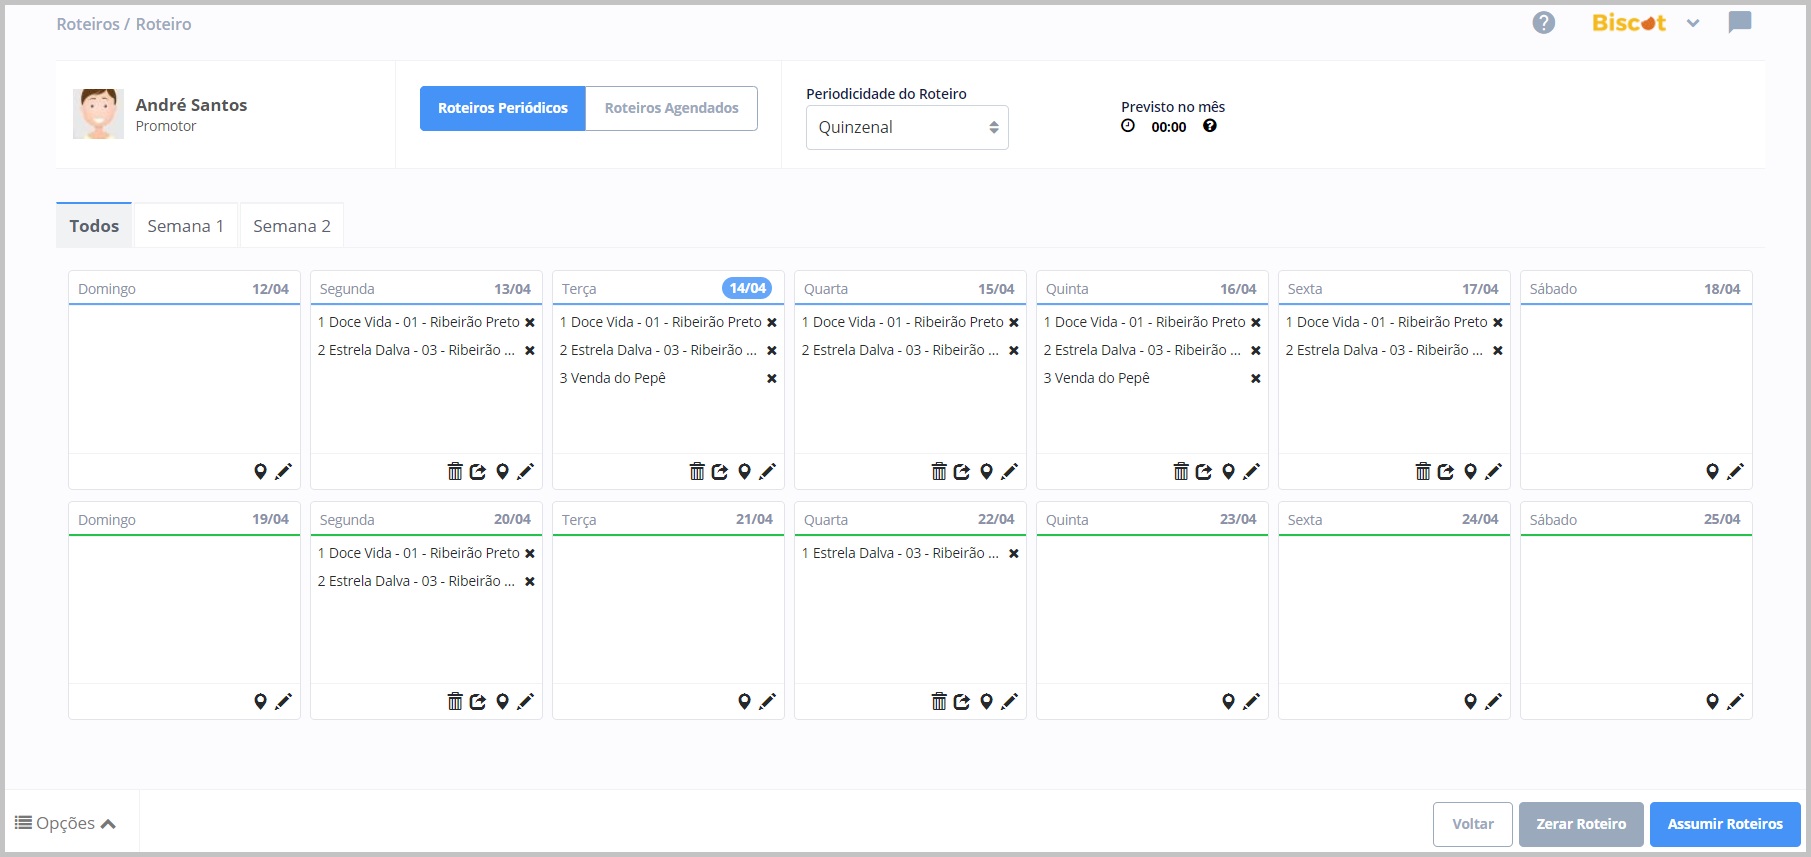
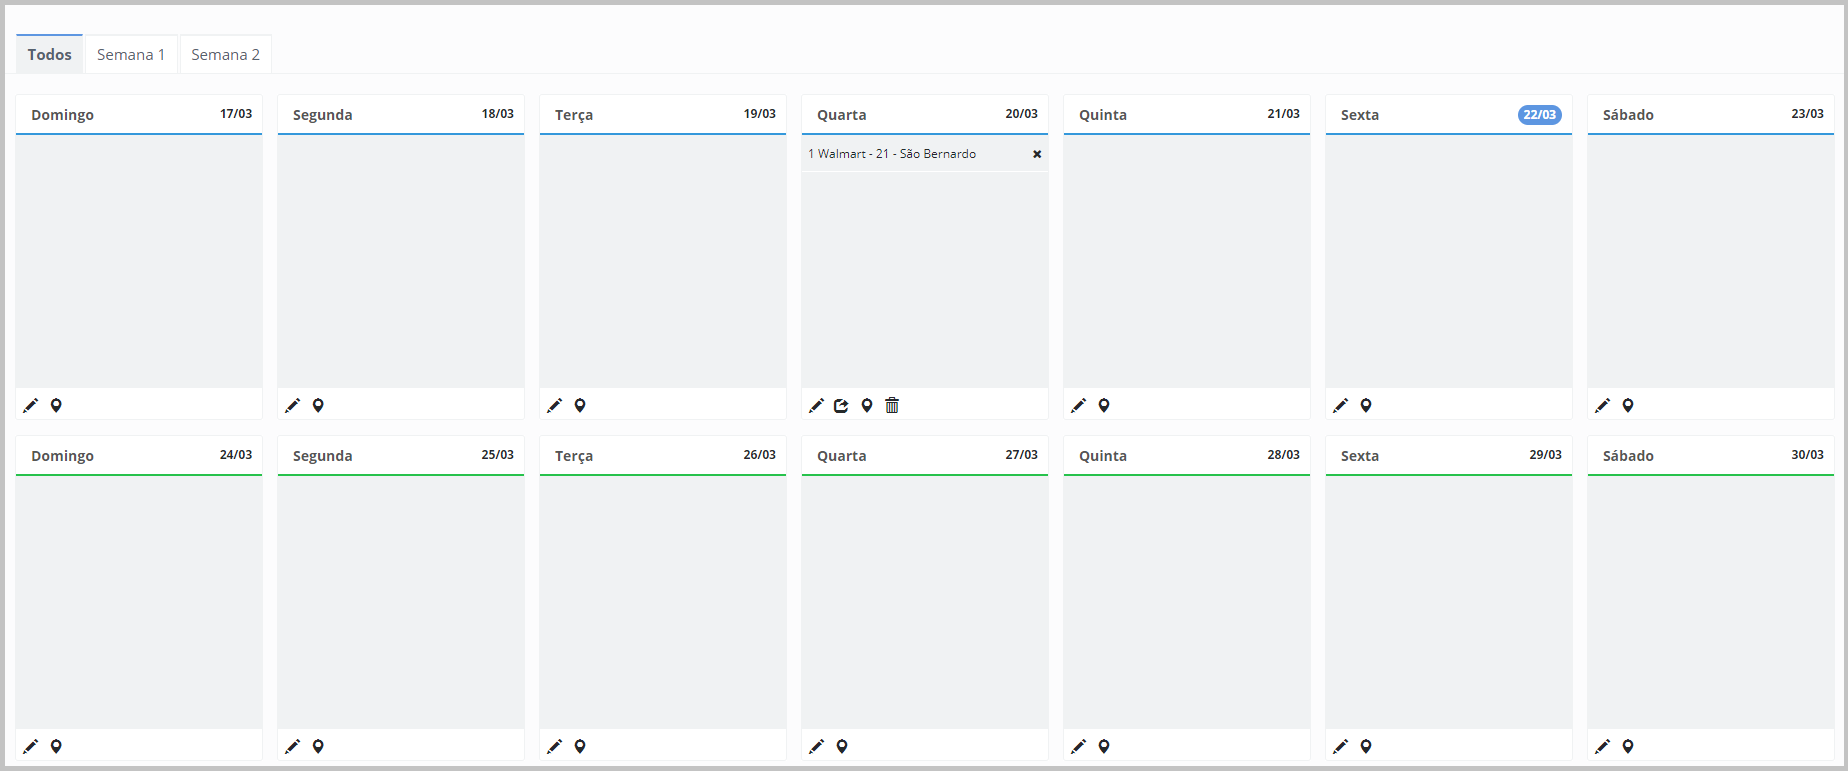
The itinerary registration takes place daily, in calendar-like fields. You can view all the fields on the same screen, or you can separate them by week by clicking on the tabs with the week number. The weeks are presented in cycles, with different colors and identification of the current date.
Points of sale can be included in the itineraries in two ways: through a list, selecting the POS by name registered in the system, or by map, selecting the POS by their geolocation. Remember that only the points of sale available for inclusion are those that are part of the same region as the employee. In addition, route planning depends on both employees and points of sale being georeferenced in the system.
EDIT ITINERARY BY LIST
To start including the points of sale, select a day of the week, click on the Edit Itinerary icon, represented by a pencil. The pop-up will open a screen with two tabs: Select POS´s and Sort POS. In the Select POS tab, there are filters to survey the points of sale. After filtering them, click on the ![]() icon to include it in the itinerary. To remove it from the itinerary, simply click on the
icon to include it in the itinerary. To remove it from the itinerary, simply click on the ![]() icon to exclude it.
icon to exclude it.
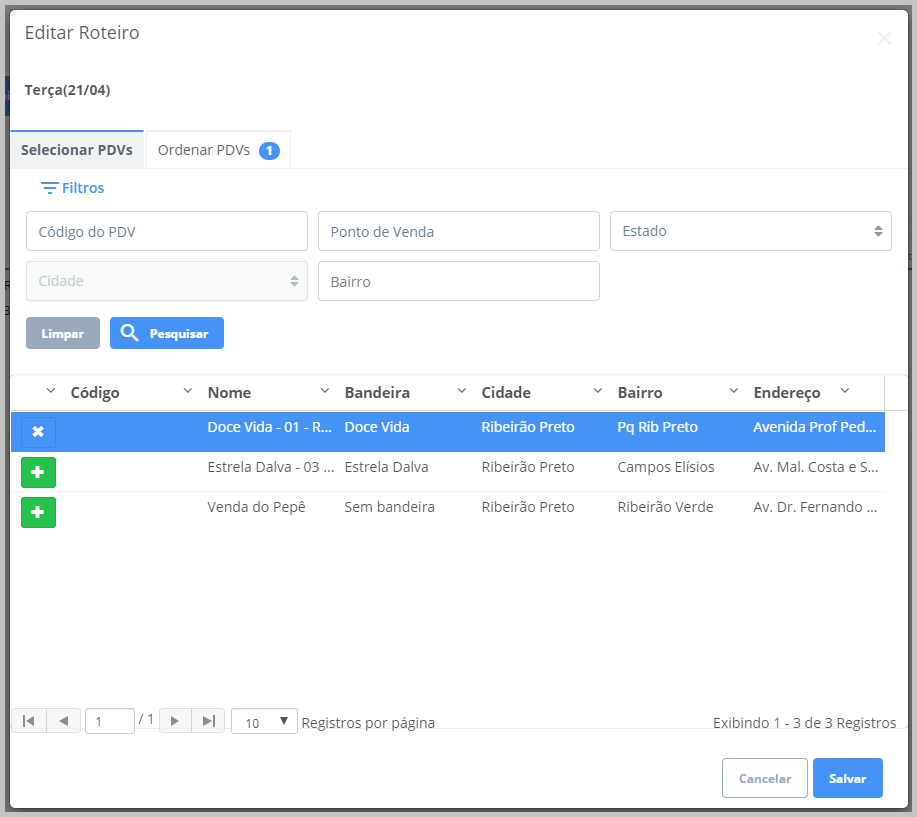
In the Sort POS tab, all the points of sale selected on the previous tab are listed. You can change the order of the list by simply clicking the mouse cursor over the name of the point of sales and dragging it to another position. You can also include the entry and exit time - to be able to generate time reports and alerts for delays as well as include a description about the point of sale - this space can be used to insert more information or details about the POS, as it will be visualized by the employee in the app. After confirming the information, simply click on Save.
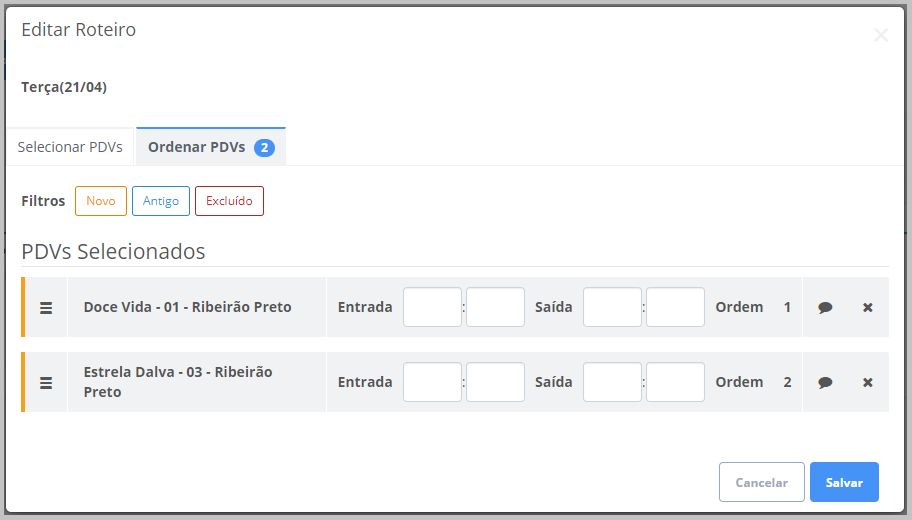
Done! You can already add the points of sale of another day of the week. If you want to delete a single POS from the day's list, click on the delete icon (x) next to the name. To delete all the POS of the day, there is also the trash icon to remove all from the list. There is also the Copy Itinerary icon, that makes it possible to duplicate the same POS list for other days of the week, so there is no rework in the registration.
For this, just click on the Copy Itinerary icon. In the pop-up that will appear on the screen, you can indicate for which days you want to copy the list of points of sale. Then check the dates you wish to copy and click on the Copy button.

EDIT ITINERARY BY MAP
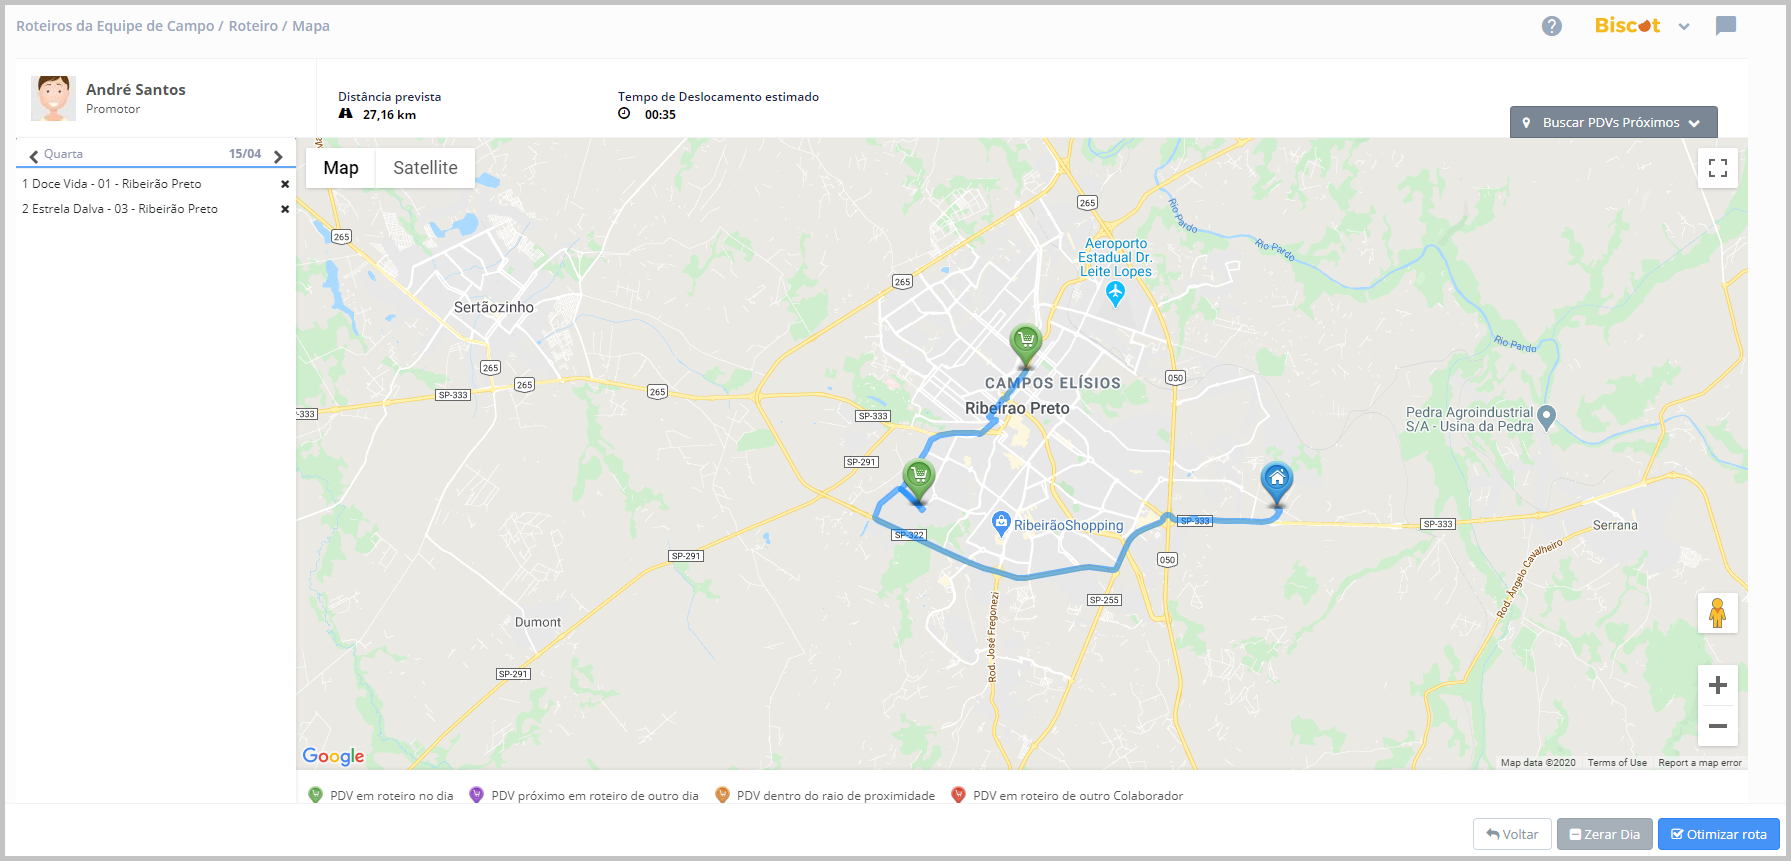
To include the points of sale by means of the map, you must make sure that they are georeferenced in your registration, otherwise they will not appear on the map for selection. Ensuring this, click on the Route planning using a map. You will be taken to the Map page, where you can navigate using Google Maps.
At the top of the screen you can use the survey filters to search for points of sale by Network, Brand, POS Type, POS Channel, State, City and also by a search radius. The map is centralized at the employee's home, so a faster itinerary can be planned for your operation. After using the filter fields, click on Survey.
After that, the filtered points of sale should appear on the map. They are shown in different colors:
- Green POS already included in the daily itinerary.
- Purple: POS already included in the itinerary of another day.
- Orange: POS within proximity radius and eligible for inclusion in the itinerary.
- Red: POS already included in another employee´s itinerary.
To include the point of sale in the itinerary of the day, click on the POS icon and in the pop-up with its information click on the Add to Itinerary button. To delete, click on it again and then on the Remove from Itinerary button.

After selecting all itineraries, click on the Optimize Itinerary button. The system presents three possibilities for route planning by map:
- Original route: It shows a list in the order the points of sale were selected.
- Shortest distance: It shows a list in the order of shortest distance between the points of sale.
- Shortest travel time: Displays the list in the order in which the employee will travel in the shortest time. Remember that traffic is not considered in this case.
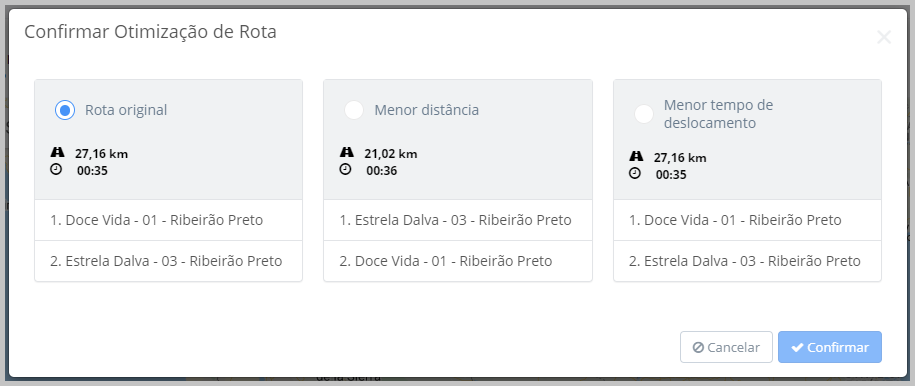
In both routes, Involves Stage automatically calculates the mileage that will be traveled and the travel time. Choose the route that will make the most sense for your operation and click on Confirm. The points of sale have now been inserted into the itinerary for the day, to return to the itinerary page click on the Back button.
Done! Your employee now has a periodic itinerary and can receive tasks. If you need to create an individual task for them, you can also create a scheduled itinerary.


Comments
0 comments
Please sign in to leave a comment.